A short walk from Kyoto’s busy streets, this class turns dyeing into something you can do with your hands. In a focused 60 to 90 minutes, you’ll work with kasamaki and nuishime techniques, see classic examples in the museum, then leave with a dyed silk memento. I love that the museum context helps you understand what you’re making, not just copy a step or two. I also like that you use traditional tools and fabrics, so the result feels genuinely tied to the craft.
One thing to plan for: you are actively wrapping and dyeing, so it’s not a sit-and-watch activity. If you want pure sightseeing time, this may feel a bit hands-on and workshop-y.
In This Review
- Key points before you go
- Kyoto Shibori Museum: where this craft makes sense fast
- Kasamaki vs. Nuishime: the two techniques you’ll actually try
- Kasamaki: stitching, pulling, and wrapping around a cone
- Nuishime: a line-stitch approach you tighten into pattern
- The practical goal: learning the process to try again
- Your finished cloth: what you make and why size matters
- Museum tour time: classic shibori samples help your eye
- Hands-on learning with real help (and real tools)
- What it feels like in practice
- Price and value: is $71.67 fair for what you get?
- Logistics that affect your experience (so you’re not guessing)
- Who this class is best for
- Should you book the Fukusa shibori class?
- FAQ
- How long is the Fukusa Shibori Class?
- What shibori techniques will I learn?
- What will I make during the class?
- Will I be able to take my work home?
- Is there a minimum age?
- How many people are in a group?
- Where is the class held?
- Do I need a paper ticket?
- Does the class include museum time?
Key points before you go
- Kasamaki + nuishime in one session: you’ll try both methods that create different resist patterns
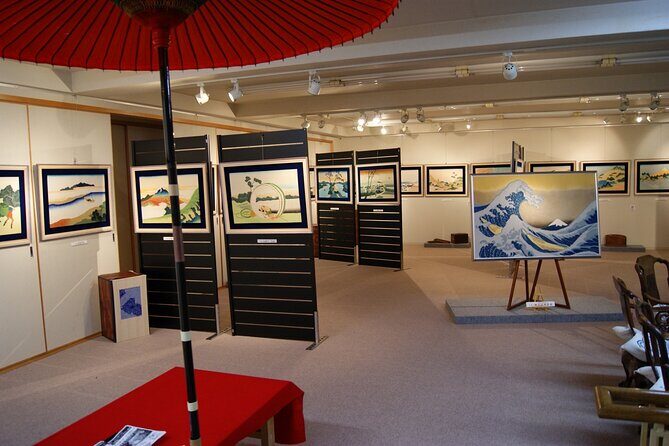
- Museum displays included: you get inspiration from prime examples before you start wrapping
- You take your own dyed work home: a silk wrapping cloth is part of the class
- Traditional tools and fabrics: you’re not just learning theory, you’re using real materials
- Small group size: up to 15 people means you can get help when you need it
- Short, practical timing: 1 to 1.5 hours fits well into a Kyoto afternoon
Kyoto Shibori Museum: where this craft makes sense fast
Kyoto can overwhelm you with sights. This experience cuts through that noise by giving you a craft with clear steps and visible results. You meet at the Kyoto Shibori Museum at 135-5 Shikiamichō, Nakagyo Ward, then you spend your time inside the museum space and studio time for the hands-on work. The format is built so you’re not guessing what shibori is supposed to look like.
Before you touch materials, you’ll explore display pieces that show the classic look of kasamaki and nuishime shibori. That matters more than it sounds. When you can see how the folds, stitching, and resist create pattern, your own piece stops feeling like a random DIY project. It becomes pattern-making.
Also, the class is paced for real learning. One helpful touch is that orientation info is often provided through an informational video and in-person guidance. That’s useful in Kyoto, where language can be a barrier. Even if your Japanese is limited, you can still get your bearings fast and know what comes next.
A few more Kyoto tours and experiences worth a look


Kasamaki vs. Nuishime: the two techniques you’ll actually try
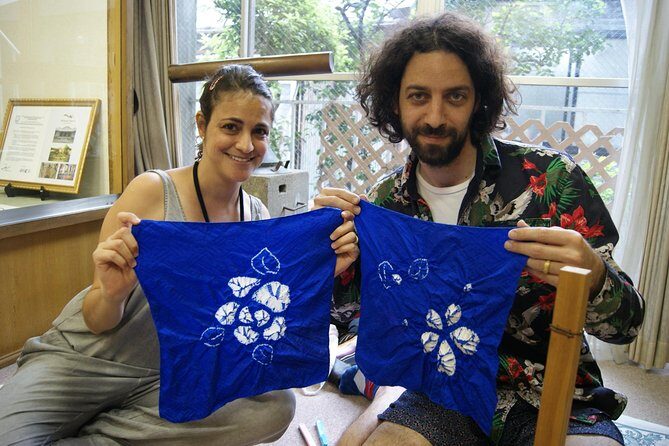
This class centers on two shibori methods. You’re not just hearing definitions. You’re doing the cloth-wrapping steps that make each technique distinct.
Kasamaki: stitching, pulling, and wrapping around a cone
Kasamaki is the method where you work around the shape you want to create. You start by stitching around the shape, pull the thread tight, and then wrap the threads around the fabric several times using a cone. That cone-and-wrap part is the key. It helps shape the resist in a way that creates crisp pattern lines when dye hits the cloth.
What you’ll likely notice as you go: kasamaki asks for patience and steady tension. If your thread tension is uneven, the wrapping can shift. That’s not a failure—it’s the real lesson. You see how small handling choices affect the final design.
Nuishime: a line-stitch approach you tighten into pattern
Nuishime is different. Instead of shaping around a complete outline, you stitch along a line, then pull the thread tight. That tightening creates the resist areas that later become the pattern after dye.
Nuishime feels a bit more linear and controlled. It’s a nice contrast after the more sculptural feel of kasamaki. By the end, you’ll understand how one craft can produce multiple looks just by changing how you stitch and pull.
The practical goal: learning the process to try again
You’ll also learn tricks so you can repeat the technique at home later. The class isn’t trying to turn you into a factory. It’s more like: here’s how this is done, here’s what you must watch for, and here’s how to plan your wrapping before dyeing so it behaves.




Your finished cloth: what you make and why size matters
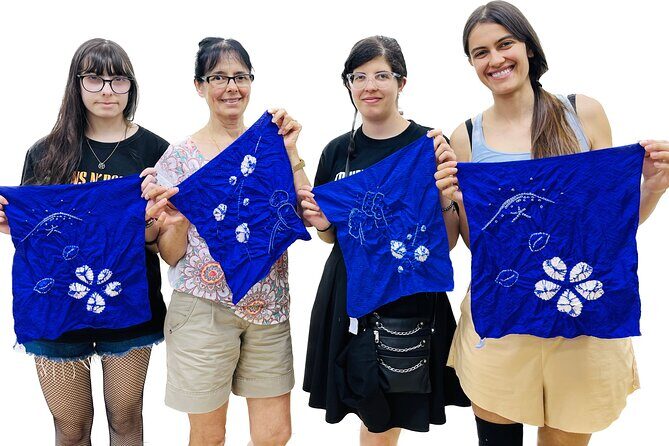
You’ll dye a silk cloth as part of the class: 38cm x 38cm. That’s a meaningful detail. It’s large enough to show pattern clearly, but small enough that the session can stay within the 60 to 90 minute window.
After dyeing, you end up with a dyed silk wrapping cloth you can take with you. Since you’re doing both kasamaki and nuishime, your finished piece may show different pattern effects across the cloth, depending on how the techniques are applied in the session.
This is one of the biggest reasons the class feels like good value: you’re not paying for a lesson where you only watch results happen. You’re paying for a tangible output you can keep, use, frame as a textile art piece, or gift.
Museum tour time: classic shibori samples help your eye
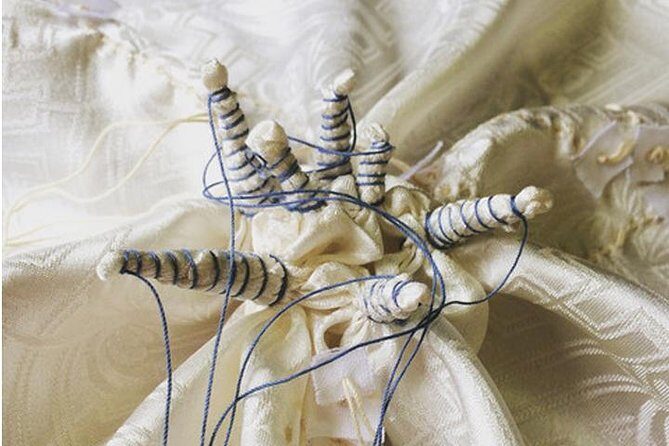
Part of the experience is exploring beautiful displays in the museum. This is where shibori stops being a buzzword and becomes something you can recognize by pattern style.
Look closely at classic kasamaki and nuishime examples. You’ll start seeing things like where patterns tighten, how dye spreads around resisted areas, and which methods produce certain line qualities. Even if you don’t take notes, your eyes start learning the “language” of the craft.
The museum shop is also part of the flow. That matters because shibori items can range from entry-level to museum-level pricing. Seeing what’s for sale after you’ve handled materials gives you context for what you’re buying and why some pieces cost more.
Hands-on learning with real help (and real tools)
This is a small group class, with a maximum of 15 travelers. That detail changes the feel. You’re more likely to get direct assistance when you’re wrapping and stitching, instead of being left to figure it out on your own.
You’ll work with traditional shibori tools and fabrics. That also matters for quality. If the materials and process were purely simplified, you’d miss the texture and handling that make shibori what it is.
From the way the class is described, you’ll be guided by an expert local craftsman. One instructor named Roy is specifically mentioned in the context of teaching and careful support. The good part of that kind of instruction is not just getting the steps right—it’s understanding why the steps work, and how to avoid common mistakes before dyeing.
What it feels like in practice
Plan on an active session: wrapping, stitching, pulling, and working through the two techniques within the same class block. One of the best parts is that it works well even on hot afternoons. You’re indoors, working steadily, and your focus stays on a single activity rather than walking around all day.
Price and value: is $71.67 fair for what you get?
At $71.67 per person, this isn’t a bargain-basement workshop. But it’s also not priced like a luxury art retreat. The value comes from three practical things you receive:
- Two techniques in one session (kasamaki + nuishime), so you’re learning more than a one-method intro
- A finished silk memento you take home, sized at 38cm x 38cm
- Context from the museum, so your pattern understanding improves while you’re learning
So you’re paying not just for time, but for materials, structured teaching, and a craft outcome. If you’re the type who likes making something with your hands and wants a Kyoto souvenir that isn’t just a trinket, the price starts to make sense.
If you’re traveling on a tight budget, it’s fair to ask: will you actually enjoy wrapping and dye steps, or do you prefer to watch craft demonstrations instead? If you’d rather observe, look for a viewing option. If you want to be hands-on, this class is one of the better ways to spend a short Kyoto window.
Logistics that affect your experience (so you’re not guessing)
This experience uses a mobile ticket, which helps you keep things simple on your phone. It also notes that it’s near public transportation, so you’re not relying on a car to get here.
Parking exists (including bike parking), with spaces available for two cars and bicycles. If you’re cycling in Kyoto, that’s a relief.
There’s also an age requirement: the minimum age is 8 years, and adult pricing applies at any age. If you’re traveling with kids, this class can work for families since it’s short and hands-on. Just remember the main focus is the craft itself—so bring patience and expect you’ll be helping with the fine-motor steps when needed.
Duration is approximately 1 hour to 1.5 hours, so it’s a good fit when you want a planned activity but don’t want to lose half your day to transfers and long tours.
Who this class is best for
This is a great match if you:
- Want a Kyoto activity that results in something you keep
- Enjoy hands-on learning more than passive sightseeing
- Like crafts where pattern matters and the process is part of the fun
- Want a smaller-group experience where staff can help while you work
It’s also a strong choice if you’re trying to balance your Japan trip with something more creative and less repetitive than temple-to-temple walking.
You might not love it if you:
- Don’t enjoy working closely with materials and tools
- Want an experience focused only on photos and easy strolling
- Are expecting a long guided tour of Kyoto’s history rather than craft instruction
Should you book the Fukusa shibori class?
Book it if you want a focused, creative Kyoto experience with a real output. The combination of hands-on kasamaki and nuishime, museum displays that help you understand what you’re making, and a silk piece you take home makes this a strong use of time.
Skip it if you’re looking for something mostly observational or if you prefer activities with minimal touching and handling. This workshop is the point: you’ll stitch, wrap, and dye with guidance.
If you’re on the fence, think about your travel style. If you’ve ever enjoyed pottery classes, textile workshops, or maker activities, you’ll likely feel right at home here.
FAQ
How long is the Fukusa Shibori Class?
The class runs about 1 hour to 1 hour 30 minutes.
What shibori techniques will I learn?
You’ll work with two techniques: Kasamaki and Nuishime.
What will I make during the class?
You’ll dye a silk wrapping cloth using Kasamaki and Nuishime shibori methods.
Will I be able to take my work home?
Yes. You take your finished work home with you.
Is there a minimum age?
The minimum age is 8 years, and adult pricing applies to any age.
How many people are in a group?
The class has a maximum of 15 travelers.
Where is the class held?
You meet at the Kyoto Shibori Museum, 135-5 Shikiamichō, Nakagyo Ward, Kyoto, 604-8261, Japan.
Do I need a paper ticket?
No. The experience uses a mobile ticket.
Does the class include museum time?
Yes. You’ll explore museum displays and see samples of classic kasamaki and nuishime shibori.